How to Organize Receipts Electronically (Save Time & Money)
Organizing your receipts electronically can save you a lot of pain.
“For every minute spent organizing, an hour is earned” – Benjamin Franklin

Benjamin was on to something with that quote.
It’s true for life, and it’s even more valid when thinking about tax season. Just think of all the receipts that you have received this year – do you have a plan on how to organize those receipts? Or are you waiting for the perfect day or hoping everything will just organize itself?
Every day you neglect to put in a little bit of effort is a day that adds up at the end of the year, when you realize you’ve run out of time. The pressure to get your taxes done is enormous. Even more so when you’re scrambling because you don’t have the right paperwork to make claims or deductions.
But fear not, a solution is at hand. With just a bit of organization, you can ease and even remove your tax season headaches.
So, why SHOULD you store, sort, and organize receipts electronically?
- To save on stress and time, while also putting more money into your pocket – takes a small commitment. But you will reap the rewards at the end of the tax season and wonder why you ever did it differently.
- To stay on top of your expenses will only take a couple of hours a month. Maybe even less using the methods we’re going to outline in this article.
If you can’t spare half an hour a week to literally put extra money in your pocket and make your tax submission at the end of the financial period a breeze – then you’re in the wrong place.
But if you’re open to organizing your receipts electronically, and the benefits this will provide, read on…
If you’re saving paper receipts, you’re doing it wrong
When we say organize, we mean it.
We’re not talking about a shoebox full of random receipts collected throughout the year. It means that you must actually file and organize your paper receipts, not store them away for a later date.
A word of warning:
Keeping your receipts in a paper form is asking for trouble. Paper receipts are becoming an artifact of history. They take up space, fade in time, and are all different shapes and sizes, making them difficult to handle and easy to lose.
The best way to organize your receipts is to turn those paper printouts into digital receipts that you can access 24/7 from anywhere. Use a software such as WellyBox to organize your receipts the best way.
How to sort receipts in the digital era?
There are many different ways that you can use to digitize your receipts.
Several software programs will help you make tax submissions easy as pie. For example, you can digitize your receipts by taking a photograph or scanning them. Some smartphone apps have OCR (Optical Character Recognition) that extracts the text and numbers so you don’t even have to type anything.
If you want to do everything electronically and with as little time spent as possible, an app like WellyBox will even pick up all your receipts from your email. You can then store your scanned receipts on Google Drive or transfer them to QuickBooks or any other accounting app.
Let’s take a look at 3 of the best methods to organize your receipts electronically.
How to save receipts to Google Drive?
If you can keep receipts in Google Drive, you don’t have to scratch around to find them for tax purposes when the time comes. Follow these steps to turn your Google storage into a receipts filing system:
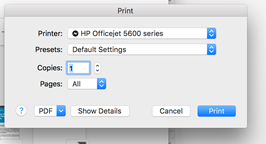
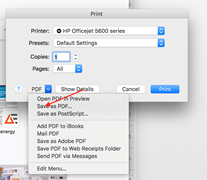
1. Save receipts directly from your desktop Chrome browser
When you’ve purchased an item from your desktop, click Print or Ctrl +P. You won’t be printing anything but you will save a PDF version of the receipt to Google Drive.
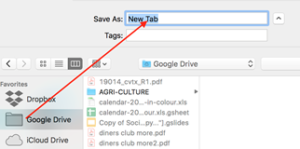
How you file your receipts is up to you. You can arrange them by the time you made bought the item or by the item’s name. Stick to one system. Don’t complicate things.
This is the information you need to find receipts later.
- The date
- Where you bought it from
- What you bought
It will look something like this:
2019-02-01 – Apple iStore – MacBook Pro + external hard drive (note – trade in old Mac for $1 500).
2. Use folders
Keep it short and simple when you create a file folder. Create folders by year and split the sub-folders into personal and business expenses. That’s it. Your drive will look something like this.

Digitize receipts with Evernote
If you use Evernote to collect notes (it is a handy filing system for notes and other digital items that you can always have in your pocket), the app can scan receipts or take photographs.
But what do you do when you receive a receipt via email – which is increasingly common in our digital age?
Have no fear – we’ve got a trick for that. It requires a little time to set up but after that, you will be able to forward mails to your Evernote inbox.
- When you sign up for your Evernote account you automatically get an email address. You can find yours by clicking the Evernote toolbar > Account Info > xxxx@m.evernote.com.
- Save this email address with a ! or a + in front of it, so that you can call it up when you’re in your email program. When a receipt arrives in your email inbox, click forward, edit the subject line to say what the receipt was for and send it.
- If you use the correct tagging and subject lines, Evernote will file the receipt in the right notebook where you can find it easily. If you want to organize Evernote even more, have a look at how you can use tags to organize your notebooks.
Here’s an example:
I’ve purchased a MacBook Pro from Amazon in 2019. The subject line of the mail/receipt I received reads like this when it arrives:
“MacBook Pro Receipt from Amazon”. Click forward. Insert your Evernote email address in the “to” field and change the subject line:
- Remove the “fwd.” or “re” at the beginning of the subject line
- Add the name of your Evernote notebook with an @ symbol i.e. @receipts space
- #2019 (# defines the tag you are adding to the notebook.)
- Your subject line will look like this: MacBook Pro Receipt from Amazon @receipts #2019 #tax
- Hit send.
- Evernote will file the receipt in your Receipts folder under 2019 taxes. Two things to remember.
- You must spell the notebook name and tags exactly as they appear on Evernote
- Separate each tag with a space i.e. #2019 #taxes.
Automate with WellyBox
WellyBox is a web-based app that gathers all your info for you and will generate an expense report. It even forwards the information to your accountant, accounting app (Wave, Xero, Expensify, or QuickBooks), or Google Drive.
The beauty of WellyBox is its intelligence. It finds invoices and receipts in all your inboxes and gathers all the receipts you need to organize and keep. It can even log in to supplier’s sites to download invoices and receipts.
In minutes, you can set up WellyBox with your Microsoft Office or Gmail account to capture all your receipts and invoices.
You can separate your business and personal expenses, tax seasons, and any other categories you want.
Reports
Once WellyBox has gathered all the data it generates a handy report. You can set it up to sort your expenses into personal and business expenses. If you have more than one business it can split the expenses between businesses. You can also assign expenses to tax categories. Gone are the days of entering data.
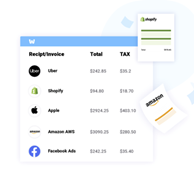
Once WellyBox has gathered all your information, the app exports reports to your accountant, accounting app, or cloud storage device. The days of tedious manual entry of any data is over!
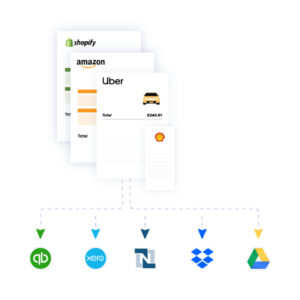
WellyBox also has a handy OCR scanner that scans or photographs paper receipts. It reads the data and converts it to text. It then files the information in categories. So, no matter how you receive your receipts and invoices, your receipt organization will level-up, and you will find it much easier to organize your receipts electronically with WellyBox.
WellyBox has a basic version that is free for life or you can give the app a full test by using the 30-day free trial to test out all the features.
Extra tips for storing receipts electronically
You’re already on your way to being a pro, but for making it this far, here are some extra tips for organizing receipts digitally.
- Don’t scan every piece of paper that looks like a receipt. Think about what you can deduct from your taxes. Can you deduct every bottle of milk you buy or a glass of wine you drink? No! If you can’t claim it, don’t scan it. But make sure you don’t miss the big-ticket items like computers, fuel, software, etc.
- Take pictures. When you rent a car, buy anything online, or order something via DHL, take a picture of it when it arrives. If you notice a ding in the bodywork of the car you rent, take a picture of it and store it on your Google Drive next to the receipt. It will make your life much easier when you need to claim from insurance or use warranties.
- Scan clearly. When you scan, a receipt make sure you can read the vendor’s name and address, the date you bought it, and the amount you paid clearly.
Final thoughts
We hope that if you were wondering how to organize receipts electronically, proactively, and productively, now you know! Whether for personal tax returns or a business, organizing receipts will save you a lot of time, stress, and money.
More than that, you will be able to run your personal and business expenses because you always know how much you spent, on what and where. It is the first step to financial freedom and tax management. Best of all, you can put in extra claims on your tax return because you haven’t missed anything, which should mean less taxes and more money in your bank account.
If that wasn’t enough of an incentive, if you switch to a digital receipts solution, you’ll also reduce paper clutter. Oh, and keeping track of your receipts is so much easier when you can just pull out a phone or a laptop and have access to everything you need.
You can finally relax when tax season comes your way because this year – you are organized!
That level of peace of mind is truly priceless.
Don’t forget to share