Intuit Inc. is an American business that specializes in financial software. Their best-known accounting program is QuickBooks, often referred to as Intuit QuickBooks. They provide many accounting services either online or through their downloadable application named QuickBooks Desktop.
These expenses cover any payment method, credit card, debit card, or any other method. There are numerous ways to enter receipts into QuickBooks, and in this article, you’ll learn all the tips and tricks you need to know to do it the best way. Let’s start by dividing business receipts into two parts: Digital receipts and physical (paper) receipts.
How to Enter Digital Receipts and Invoices into QuickBooks? [The Easy Way]
- Purchase a product or a service online or offline but get a digital receipt or invoice.
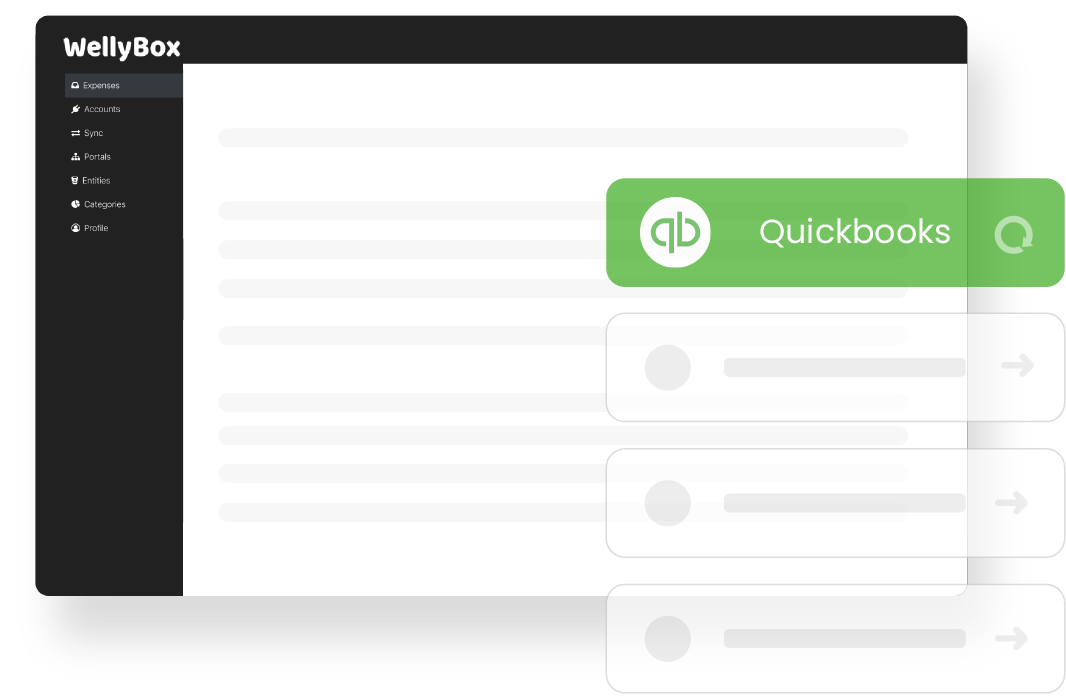
- After connecting your mailbox account to WellyBox (if you didn’t do it yet, connect for free), go to your WellyBox dashboard.
- Click on “Sync” on the left-hand side. You can watch this Demo Video to help you as well.
- Click on the QuickBooks integration and connect to your QuickBooks account.
- That’s it. Your receipts were entered automatically into QuickBooks. From now on, every time you’ll click on sync, your digital receipts will automatically be transferred to your QuickBooks account.
If you have digital receipts located in vendors that don’t send receipts via email, you can connect them directly to WellyBox. WellyBox is connected to 1000+ top merchants to help owners transferring receipts into their accounting software are their accountants.
How to Enter Expenses in QuickBooks Automatically?
To Add Digital Receipts and Bills to QuickBooks online:
- Login to QuickBooks Online
- From the left menu, select “Banking and Receipts.”
- Choose “Register your email to get started.” You will now have access to your account.
- Attach your relevant paperwork and send them in the body of an email. You can take photos of paper bills and send them or forward them in an email (such as an online purchase, Uber ride, etc.). If you send a file, it should be a pdf, jpeg, jpg, gif, or png. Keeping track of the file type you use will help your documents have a uniform, professional-quality them.
- Send this information to receipts@quickbooks.com. Processing might take a few minutes. If something doesn’t quite work, you will get an email informing you that the account entered your expenses.
Take a Snap a Receipt from your Mobile to add a Paper version into your records.
- Install the Online app
- Open the app, then tap the Menu ≡
- Click on Receipt snap
- Tap the Receipt Camera and snap a photo of your receipt.
- Tap Use this photo, then Done
Entering Expenses in QuickBooks Manually
Open a web browser, then sign in online. Go to the Banking or Transactions options and select the Receipts tab. Drag the pages directly into QuickBooks Desktop or Online, or select Browse to upload them.
How to Create and Enter Invoices in QuickBooks?
1. Create Invoice
On your Dashboard, go to the Invoicing area and Choose “Send your first invoice” to send your first expense invoice.
2. Pick the Customer You’re Invoicing
If this isn’t a customer you’ve entered into QuickBooks yet, you can add their details here or Choose to Save to add this name to your Customer List.
3. Choose the Payment Terms
For example, Net 30 means this customer must have their account paid within 30 days of this invoice after the invoice date.
4. Enter What You Sold
If you haven’t added this service or product yet, click “Add.” You can then enter the product or service information. This includes the accounts information, your record of the transaction, and expenses.
5. Email the Invoice
If you want to email the invoice to your customer, be sure to enter their email address. Be specific when discussing the expenses and the price of an article to avoid confusion over the transaction details between the payee and the vendor.
6. Preview Your Invoice
At the bottom of the invoice, click “Print” and then “Preview” to view this version of the document. Click Close when you’re done. Check the numbers and date to make sure everything is as it should be. Make sure the right bank is listed.
7. Customize Your Invoice
To customize how your invoice looks, Choose “Customize,” then “Edit Current” at the bottom of the categories available for the invoice.
8. Add Your Logo
Pick your logo file from several available ones or upload one of yours. QuickBooks matches the template colors of your logo. If you’d like a different color for your logo, pick it on the image. Quickbook users can save a logo they wish to attach to their account’s business information.
9. Change Your Invoice Template
If you’d like a different look, to the left of the invoice, you can scroll through and choose templates to change the look of your invoice. Be sure to save your invoice when you’re done.
10. Set Up Online Payments
Online Payments make it fast and easy for your customers to pay vendors. As a user of Intuit inc terms and services, you will want to be one of these vendors to access these and related users. Click “Get set up,” then fill out a simple application.
11. Send Your Invoice
When you’re ready to email your invoice, click “Save and send” to send the expense invoice.
12. Customize Your Email and then Send It
You can change the subject and the body of the email to anything you like. Then choose the option to “Send and close” to send the expense invoice.
How to Enter Old Invoices in QuickBooks?
You can import invoices in the section import data.
This is in the cog in the top right>import data>invoices.
The associated record will need to be in a CSV format.
How to Enter Expenses in QuickBooks Receipts online?
Open a web browser, then sign in to QuickBooks Online. Go to the Banking or Transactions menu and select the “Receipt tab.” Drag these directly into QuickBooks Online, or select Browse to upload them. You can also email all related records to QuickBooks, where they’ll show up.
- Enter the Vendor options, then select Receipt Management.
- Choose the Intuit Account you use for the company file. …
- Drag the receipt into QuickBooks or select “browse” to upload, then select “your receipts.”
How to Enter Sales Receipts in QuickBooks?
When you receive full payment for a product or service at the sale, the correct form to use in QuickBooks is the Sales Receipt. Click the “Create Sales Receipt” icon on the home page.
You can open this in a new window if you want.
How to Upload Paper Receipts to QuickBooks Desktop?
- Open the QuickBooks Online mobile app.
- Open the app and tap the Menu ≡ icon.
- Tap Receipt snap.
- Click on the Receipt camera icon and snap a photo of your receipt.
- Tap Use this photo, then Done.
How to Enter Mileage Expense in QuickBooks Online?
- Choose Settings ⚙ and then Chart of Accounts.
- Click “New.”
- Select Expenses => From the Detail drop-down menu, select Auto or Travel.
- Give the account a unique name that’s easy to identify.
- Save and Close.
How do I Enter Expenses in Intuit QuickBooks pro?
The expense list is located in the Expenses menu at the left pane:
- Choose +New.
- Click Expense under Vendor.
- Select your respective account under Category details, Category column.
- A description is optional. Enter the Amount.
- Save and close.
How do I Enter Credit Card Expenses in QuickBooks Online?
As paying users, everyone who is a customer of Intuit QuickBooks can expect to get the full benefit of all of its products’ features.
- Press the +New button and then Expense.
- Choose the Payee from the drop-down list. And Specify the Credit Card with which you made the purchase.
- In the Account details section, specify Owner’s Equity or Partner’s Equity in the Account column.
- Enter the amount of the purchase.
- Hit Save and close the window.
How to Enter Meal Expenses in QuickBooks?
Meal expenses and transactions of this category fall into entering a receipt as covered by the earlier record.
How to Enter Petty Cash Expenses in QuickBooks?
Petty Cash expenses can be saved on QuickBooks Desktop or online version using the methods mentioned above. Petty cash can be logged along with other expenses in your expense account. You can connect this to your pricing and service options.
How to Enter Cash Expenses in QuickBooks?
A cash expense is generally exchanged for a paper receipt. As a business transaction, a cash transaction is like any other transaction a user of QuickBooks may use that involves the article of a paper receipt. Snap the receipt and connect it to the record on your account.
How to Import Receipts in QuickBooks?
While the option to import a sales receipt is unavailable, you’ll want to manually enter expenses into QuickBooks Online following a simple number of steps.
- Open the QuickBooks Desktop Android app, then tap Receipt Snap.
- Tap the company to upload receipts to, then tap Continue.
- Then, tap Capture receipt.
- Tap the Camera icon to take a picture of the receipt, or tap the Photos icon to upload your receipt.
How to Import Expenses in QuickBooks?
You can import your expenses using an Excel file.
Make sure you save the old file as a CSV file after formatting the columns. After formatting the file, we can already import it to QuickBooks. Follow the detailed steps in this article: Manually upload transactions into QuickBooks Online.
How to Organize Expenses in QuickBooks?
Log in to your QuickBooks Online account, then click on Expenses at the left pane. “Expenses beside Vendors. “
Check the box beside the Date column for the transactions you want to categorize. Tap on the drop-down arrow beside Batch actions, then select “Categorized selected.”
How to Forward Receipts to QuickBooks?
If you have a receipt, you can email it to QuickBooks. We’ll extract info from it and create a transaction for you to review. Then you can edit the receipt, connect it to an account, or match it to an existing transaction in the Receipt tab. You’ll also have the receipt on file for tax time.
Forward images of receipts and bills to QuickBooks
First, capture an image:
- Take a picture of your bill or receipt on your mobile device. The photo must be a pdf, jpeg, jpg, gif, or png.
- Make sure each image or file contains only one receipt.
You can send multiple receipt images in one email. The email attachment’s file size must be between 46KB to 20 MB.
Email the image to yourself.
QuickBooks automatically pulls dates, amounts, vendor, and last four digits of the credit or debit card from the image.
Review and categorize your bills
Now that all of your expense account bills are in QuickBooks desktop or online system.
QuickBooks Expense Tracking
The QuickBooks Self-Employed app comes with built-in receipt scanning to help you follow and organize your expenses.
Snap a photo of a receipt, and QuickBooks Self-Employed will attach it to the expense it matches. When it comes time to file taxes, receipts are stored and ready to use.
How to Track Project Expenses in QuickBooks
Use projects in QuickBooks Online to follow your project’s profitability.
You can add project income, expenses, and labor expenses, connect old transactions to new projects, and run project-specific reports from a single dashboard.
Step 1: Turn on projects.
If it isn’t already, turn on the Projects feature:
- Click Settings ⚙, then Choose Account and settings.
- Go to the Advanced tab.
- Find the Projects section and Click Edit ✎ to expand it.
- Turn on Organise all job-related activity in one place.
- Click Save and close your settings.
Step 2: Create a new project
- Click Projects =>Click Start a Project if this is the first time you are creating. Or click New Project if you’ve already created one.
- In the Project Name field, enter the project name.
- Click the project customer from the Customer ▼ dropdown.
- Attach any notes or details about the project in Notes.
- Save.
You’ll see your list of projects grow as your business takes on more work. After you’ve created a project, you can attach both new and existing transactions to the project.
Step 3: Add new transactions to a project
You can add new transactions like invoices, expenses, or estimates directly into your project. Adding transactions to projects won’t change how they’re categorized or affect your accounts. You’re simply marking them as a part of the project so you can follow a specific project’s income and expenses.
- Click Projects.
- Choose your project.
- Select the Add option to the project to create a new transaction.
- Click Invoice, Receive Payment, Expense, Estimate, Purchase order, Time or Bill.
- Save and close.
Step 4: Add existing expenses to a project
If you have existing expense transactions billable or nonbillable that you’ve already added to QuickBooks like bills, cheques, expenses, or purchase orders, here’s how to attach them to your project:
- In the Expenses tab, find and open the transaction you want to connect to your project.
- In the Customer/Project column, Click the ▼ dropdown. Then pick the project. Do this for each expense item you want to attach to your project. This is different from the payee for the expense. Note: If you don’t see the Customer/Project column, you can turn on the setting “Track expenses and items by customer” in the Expense section of your QuickBooks account.
- Save and close.
Step 5: Add existing timesheets to a project
If timesheets are not billable, but you still want to attach them to a project to understand your profitability, you can find and add them in the Weekly Timesheet.
Step 6: Add existing invoices to a project
Creating new invoices to attach to a project is simple, but adding existing invoices to your project – especially ones linked to a payment – require a little caution before you edit them.
Step 7: Track your labor costs.
You can add the hourly cost rate for each employee, and QuickBooks will multiply the hourly cost rate by the hours worked on calculating your labor costs.
Step 8: Keep everything running smoothly.
Now that you understand how to follow project costs and profits, here’s how to make sure what you’re seeing is accurate:
- In the Overview tab, use the income and cost columns as guides. Make sure the correct column total increases when you attach invoices, expenses, and weekly timesheets. You can see these costs on the Time Activity tab or your Time cost by employee or supplier report if you’ve set up hourly cost rates.
- The Time Activity tab breaks down your team’s work by date. It also provides the total cost of each employee and service you offer so you can follow the costs of different parts of your project.
- The Transactions tab lists all transactions associated with a project. You can complete tasks directly from this screen, such as converting an estimate to an invoice.
- Review your Time cost by employee or supplier reports every month. Make sure you’ve correctly tracked all project-related work hours. If you’re missing hours or counting too many hours, your profit totals will be inaccurate.